DYMO LabelWriters print 2.25" × 1.25" price tags over USB. This guide walks through the one-time setup: install the driver, connect the printer, load a roll of 30334 labels, and confirm it prints from Vinty. Works for any LabelWriter in the line (450, 450 Turbo, 550, 550 Turbo, etc.) — the install is identical regardless of which one you bought.
What you need
- Any DYMO LabelWriter (450, 450 Turbo, 550, 550 Turbo, or newer) with its included USB cable and power adapter.
- A roll of DYMO 30334 Multipurpose labels (2.25" × 1.25"). These are the price-tag-sized labels Vinty's default printer config is built around.
- Your Mac or Windows PC with an available USB-A port — or a USB-A → USB-C adapter if you're on a recent MacBook.
Step 1 — Install the DYMO driver
The printer won't show up on your computer until you install DYMO's companion software, DYMO Connect for Desktop.
- Go to https://www.dymo.com/support?cfid=dymo-compatibility-chart.
- In the Select DYMO machine dropdown, pick the exact model printed on the front of your printer (e.g. LabelWriter 450 Turbo).
- Select your operating system (macOS or Windows) and version.
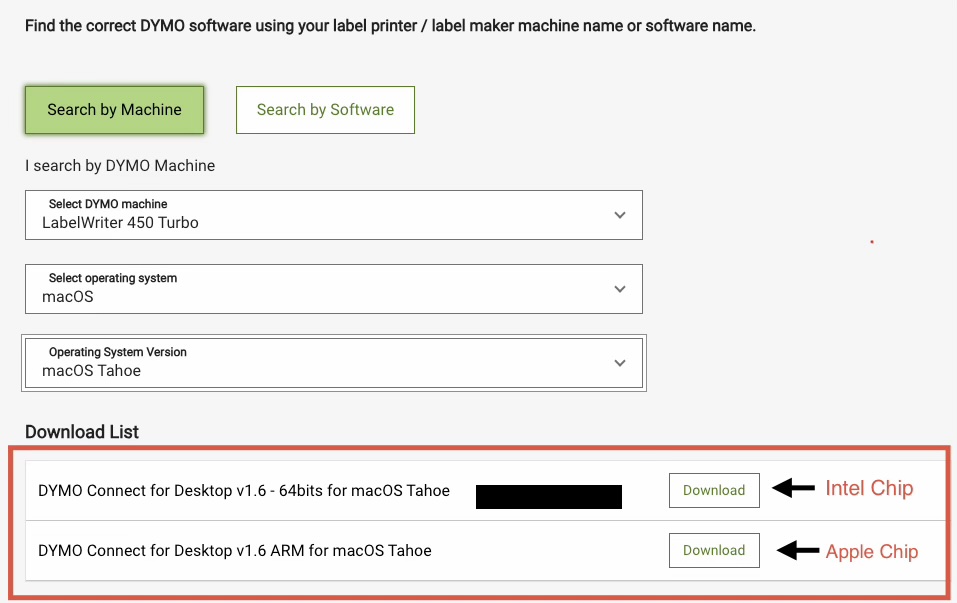
- The Download List may show several builds. Always pick the newest version number (currently v1.6), then choose the build that matches your computer's architecture — see below for which one.
- Run the installer. Approve the security prompt that appears the first time it runs.
Which build do I need?
On macOS — two builds, both v1.6:
- ARM — Apple Silicon Macs (M1, M2, M3, M4). Any Mac bought new from late 2020 onward.
- 64bits — Intel Macs.
Not sure? Apple menu → About This Mac → look at the Chip line. "Apple M…" means ARM; "Intel Core…" means 64bits.
On Windows — four builds. Two are older versions (v1.4.6 and v1.5.1) kept around for legacy compatibility — ignore those unless DYMO support has specifically told you to install one. Pick from the v1.6 builds:
- v1.6 - 64bits — for 64-bit Windows. Almost everyone, especially on Windows 11 (which only comes in 64-bit).
- v1.6 - 32bits — for 32-bit Windows. Only on older Windows 10 / 8 / 7 PCs that were explicitly installed as 32-bit. Very rare today.
Not sure? Start → Settings → System → About → look at System type. "64-bit operating system" → install v1.6 64bits. "32-bit operating system" → install v1.6 32bits.
Step 2 — Plug in the printer
- Plug the power adapter into the printer and into a wall outlet. The printer's status light should glow.
- Plug the USB cable between the printer and your computer.
Then verify your computer sees the printer:
On macOS
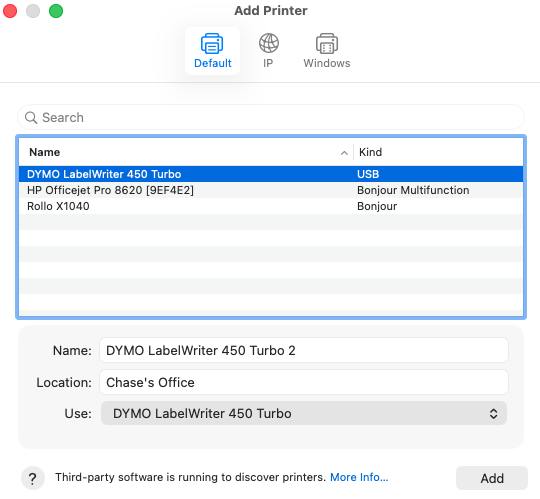
Open System Settings → Printers & Scanners. The DYMO LabelWriter should appear in the list within a few seconds. If it doesn't, restart the Mac with the printer plugged in — sometimes a reboot is needed to pick up a brand-new printer.
On Windows
Open Settings → Bluetooth & devices → Printers & scanners. The DYMO LabelWriter should appear in the list within a few seconds. If it doesn't, restart the PC with the printer plugged in — sometimes a reboot is needed to pick up a brand-new printer.
Step 3 — Load a roll of labels
- Lift the top cover of the printer.
- Drop the 30334 label roll onto the spindle so the labels feed out from underneath the roll (not over the top — the thermal print head is on the underside).
- Feed the leading edge of the labels into the slot at the back of the print area. The printer auto-detects the roll and pulls it through to the start position.
- Close the cover.
If you feed the roll the wrong direction the labels come out blank — the thermal coating is only on one side. If your first test print is blank, this is almost always the cause.
Step 4 — Test print from DYMO Connect
Before you print from Vinty, confirm the printer + labels are working from DYMO's own software. This isolates printer setup from any Vinty-side issue.
- Open DYMO Connect for Desktop — from Applications on macOS, or the Start menu on Windows.
- Pick a built-in template like Address Label.
- Type anything in the label field.
- Click Print.
A label should come out within a second or two with whatever you typed on it. If it does, your printer + driver + labels are all working correctly.
If the print comes out blank, see Troubleshooting below.
Step 5 — Configure Vinty's label default
Now that the printer works, set Vinty's default so the system generates correctly-sized labels for everyone in the store.
- In Vinty, go to Settings → Labels (admin only).
- Set Label Size to Multipurpose · 2.25" × 1.25" (30334).
- Set Barcode Format to Code 128 (the default — works with every scanner).
- Save.
That default applies to everyone in your store. Anyone who prints from the Print Labels page or directly from an item's detail page will get correctly-sized 30334 labels.
Step 6 — Print your first label
The first time you print from your computer to a new DYMO, the operating system's print dialog needs a one-time configuration. After saving this as a preset, every future print uses the right settings automatically.
- Open any item in your inventory and click Print Label (or go to Print Labels in the sidebar, add an item to the queue, and click Print).
- A new browser tab opens with the PDF, and the system print dialog opens automatically.
- Printer — confirm your DYMO LabelWriter is selected.
- Paper Size — click the dropdown. The default is usually US Letter or whatever you printed last. Find 11354 Multi-Purpose in the list, then hover over the right-arrow to open a sub-menu of variants. Pick 30334 2-1/4 in × 1-1/4 in.
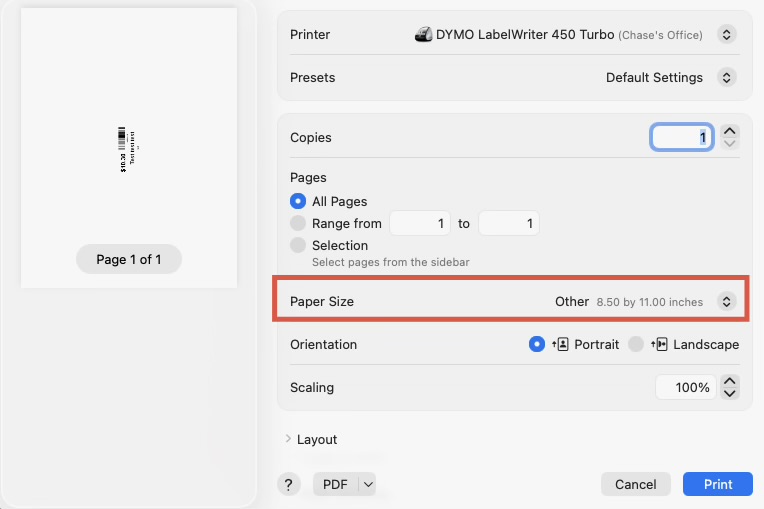
This is the only confusing part of the setup — 30334 isn't a top-level option; it lives one menu level deeper, nested inside the 11354 Multi-Purpose category. Once you've selected it, the dialog remembers it for the rest of this print session.

- Orientation — Portrait works correctly.
- Scaling — 100%.
- Click Print and your first label should come out the printer.
Save your settings as a preset
If you'll always print labels this way (true for almost every store), save the dialog settings as a named preset so you don't have to drill into the Paper Size sub-menu every time.
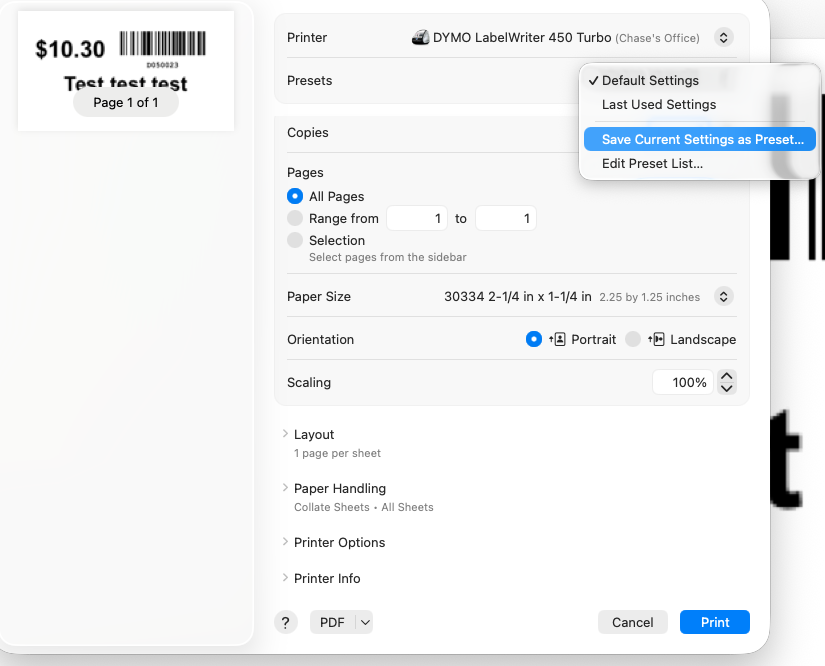
- Click the Presets dropdown at the top of the print dialog.
- Pick Save Current Settings as Preset….
- Name it something obvious like "Vinty DYMO Labels" and save.
Next time the print dialog opens, choose that preset from the top dropdown and macOS restores the printer, paper size, and orientation in one click.
For the full day-to-day printing workflow (selecting items, batching, the chip-picker for cardstock/Avery overrides, etc.), see the Print barcode labels article.
Troubleshooting
Test print came out blank. The roll is loaded upside down. Open the lid and flip the roll so the labels feed out from underneath the roll, not over the top. Try the test print again.
Printer doesn't appear in Printers & Scanners. DYMO Connect isn't installed, or it installed but the OS hasn't detected the printer yet. Confirm DYMO Connect is in your Applications folder (macOS) or Start menu (Windows). Unplug the USB cable, wait 5 seconds, plug it back in. If still no luck, restart your computer.
Labels come out fine but Vinty prints with wrong margins or clipping. Your Paper Size in the print dialog is set to something other than 30334. Reopen the dialog, navigate the Paper Size dropdown to 11354 Multi-Purpose → 30334 2-1/4 in × 1-1/4 in, and try again. Save as a preset so this doesn't need re-doing next time.
Printer light is solid red. Out of labels or jammed. Open the lid, remove and reseat the roll, close the lid. The red light should go to solid green.
Still stuck?
Contact our support team and we'll walk you through it on a screen-share.